Obscure Bushcraft Skills
Posted 5 years ago
We’ve got that Friday feeling here at LifeSaver – we’ve survived the week and we’re cruising into weekend. So, for those of you who may be heading off grid for a few days, we’ve pulled together three of the most obscure bushcraft survival tips and skills we could find. You never know when they may come in useful. You don’t always have the right survival gear or survival tools. Using these techniques to survive could make all the difference and they’re great for emergency preparedness too.
- Survival Cement
We didn’t even know survival cement was a thing. But we now know it’s essential for people living off grid. In the wilderness, disaster can strike at any time, so even short term shelters need to be robust.
Survival cement is durable, easy to make and the ingredients – a mixture of mud and grass – are easy to find in most situations. Additionally, it’s great for building lots of different things – walls, an oven, a food store or containers.
So how do you make it? It’s quite simple.
Make your mud
The mud you use for survival cement should have a high clay content, ideally. If you squash some of the mud into the ball of your hand and it retains its shape, that’s a good sign.
Collect some grass
Next, collect or cut some grass and add this to your mud. The length of the grass will depend on the task for which you will be using the cement. For example, when constructing large structures, such as a kiln or cementing over the walls of your shelter, the grasses should be longer and run all in one direction rather than be thrown in randomly. This will provide strength to the cement.
Mortar Mix
When you want to use your survival cement as a mortar, just dilute the mud a little more to create a slightly thinner and wetter consistency. This will make it easier to apply and ensure better coverage.
Use a Bucket
If you fill a bucket or container with mud, you’ve got your source directly to hand whilst you’re using it.
Keep it moist
If you need to leave it for any time, always seal your survival cement as best as you can, so it retains its moisture content.
Water Carefully
If your mud does dry out, add water to help rehydrate it, just a little at a time. It’s much easier to add more water than it is to regain the preferred consistency
Check out this great video from Corporals Corner, which goes one step further and demonstrates how to make Roman Concrete.
2. Opening a can without a can opener
So, this is a worthwhile hack to know – even if you just use it at home when you can’t find the can opener and desperate measures are needed!
Hold the seam of the can – look for the expiration date, it’s usually near this – against a hard surface. This can be a rock, concrete floor or a wall.
If your surface is smooth, scrape that side of the can back and forth. However, if your surface is uneven, push the can hard against it and twist back and forth. The pressure and friction will scrape off the seam. Once you can see or feel liquid coming out, you can either pull off the top if that’s possible or use something hard and blunt to prize it open and voila!
Here’s a video from Survival Life to see how it’s done.
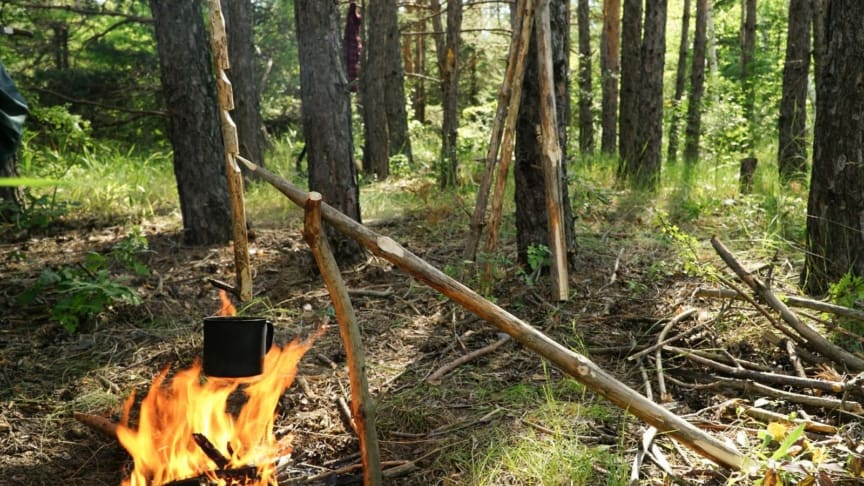
3. Pot Hanger
If you’re taken by surprise and find yourself unexpectedly staying out late in the wilderness, it’s not likely that you’ll have your cooking stove with you. Still you can create your own effective pot hanger to cook directly over the flames of your fire. Whilst there are some complicated alternatives out there like these from Bushcraft Days and these from Outdoors and Bushcraft, we like this simple alternative.
What you’ll need:
3 sturdy branches – one with a natural fork, one with a natural hook and one just straight and longer than the other two.
Step1: Stick the forked branch vertically down into the ground, so it’s firm and well positioned for your fire.
Step 2: Sharpen both ends of the longer branch. Resting it across the fork of the first branch so it leans high over your fire. Embed the other end securely into the ground and fix well with stones and anything else that comes to hand, so that it can hold the weight of your pot.
Step 3: Carve a number of notches in the side of the branch with the natural hook, so you can rest the point from the main branch into these notches. This will then hang over the fire and your pot will rest on the hook just above the flames.
So to all you off gridders, survivalists, trekkers, ramblers, walkers, outdoor enthusiasts or just those of us who will be enjoying some downtime – whatever you’re doing, happy weekend guys!
*Photo by Outdoor and Bushcraft.
Back to News